Airline Mogul Forum

My first livery...HELP!

Rionescu

  • Airline Operative
  • *
    • Posts: 11
    • View Profile
on: August 14, 2009, 12:39:13 am
This is an Airbus A319 with the livery of my fictional airline. I used photoshop CS4 to make it if anyone has suggestions.

When I finally managed to get the windows, wing, etc. to show where they would be covered by the design, it faded the colours and the horizontal stabilizer, among other things, is slightly transparent.
I need to know how to get the windows, wing, etc. in front without these effects. I'm fairly new to PS, so I would like the instructions to be as basic as possible.

I would also appreciate if anyone has any suggestions, and if possible, the precise instructions for PS. The colours I want to be used are blue, orange and green.


expressair

  • Airline Operative
  • *
    • Posts: 190
    • View Profile
Reply #1 on: August 14, 2009, 05:50:53 pm
You mean you want it look something like this??

Airline Mogul - See my airline
*BOM *KMG
W 1217
ID 14682


Rionescu

  • Airline Operative
  • *
    • Posts: 11
    • View Profile
Reply #2 on: August 14, 2009, 07:57:45 pm
Yeah, how did you make it look so nice?


expressair

  • Airline Operative
  • *
    • Posts: 190
    • View Profile
Reply #3 on: August 15, 2009, 09:03:23 am
I use CS2, but i feel the basic working should be the same as CS4.
I'll tell you what i did step by step:
1. Image->Mode->RGB Color. But i guess you already did this.
2. Use Levels [Ctrl+L] to slightly darken the outlines. Move the sliders to the right.
3. Polygonal Lasso [L] to make the stripes in the tail. I think you did the same thing too.
4. Paint Bucket Tool [G]to fill in the paint. By using the lasso and paint bucket, you only fill one panel at a time. Therefore you can prevent eh paint from going to unwanted places [like what happened to you horizontal stabiliser].
5. To give a depth to the white part of the paint, i use a pre-shading method. But before that, create a duplicate background. To do this right-click on the image in the "layers" tool bar and select "Duplicate Layer". Now select the paint bucket tool  and then left click on the color options. This will open a window where you can select the desired colors. Of the 2 columns, the bottom left one will have a "#" symbol and a box with alphanumeric in it. Type f7eed9 into it. That is the color i use. Then fill in the white part of the livery. One you have finished it, in the "Layers" window set "Opacity" to 65%. And then flatten image. This will make the fuselage look more realistic.
6. Use the Gradient Tool [Right click on the Paint Bucket button. You can select Gradient tool from the drop down menu]to give the shadow/shading to make the pic look 3-Dimensional.

Quote from: Mr. Orange
Well, you're using Photoshop, that's a big plus already. Basically, what you do is you create a new layer that goes over your painting layer, whichever that is, and stick a simple gradient in there using the Gradient Tool, then selecting the preset white to black gradient. You make sure the white is completely see-through (opacity at 0%), then drag the tool top to bottom over your livery. Then just crop out the bits of the gradient you don't want to have in your livery, basically everything that's not the airplane, adjust the opacity of the layer until you think it works, and you have a very, very basic shading.

Basically i've following the advice/tips given by him. Best person to contact for Livery related queries.

Hope it helps
Cheers
Airline Mogul - See my airline
*BOM *KMG
W 1217
ID 14682


Rionescu

  • Airline Operative
  • *
    • Posts: 11
    • View Profile
Reply #4 on: August 15, 2009, 03:26:49 pm
Thanks so much, I've been doing everything wrong.


Rionescu

  • Airline Operative
  • *
    • Posts: 11
    • View Profile
Reply #5 on: August 16, 2009, 07:28:07 pm
Here is my new livery. Do you have any suggestions?

BTW, I couldn't figure out the gradient. Basically I couldn't figure out how to set the opacity of just one colour to 0 without changing the overall opacity.


MrOrange

  • Administrator
  • Airline Senior Manager
  • *****
    • Posts: 3805
    • View Profile
Reply #6 on: August 17, 2009, 10:46:00 am
That's a big improvement from the first version, I'd say. Still there are some things that look like they could be improved, the gradients as you noted and the fuselage lines shining through the paint, which they now almost don't. I'm not sure off-hand how to do that in CS4, but in CS3 you may want to change the following things:

- Set the layer mode for your paint layer, assuming you have one, to Multiply. This is usually done by changing a dropdown menu selection thingy, which in your case is probably set to Normal. The dropdown is usually located in your Layers Window. Also, make sure your paint layer is located directly above the template layer. Doing this will cause the paint to look a lot more realistic.
- For gradients: what you want to do is to create a simple black-to-white (or vice-versa) gradient, which is quite easy in CS3 and, I can imagine, similar in CS4.

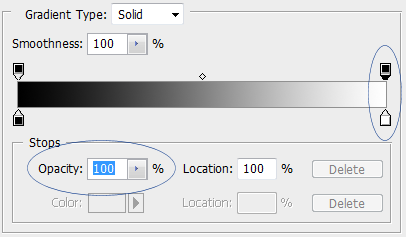
This is the screen in which you edit gradients. The two blue ovals indicate the places you want to be to change opacity and color. You see the gradient outlined near the middle of this section. The right markers determine the way the color on the right will be looking, the left markers ... etc. The top left market determines the white color opacity. Just click that marker and set opacity to 0, which is listed at the bottom blue oval.

Also, don't forget to put the gradient in a separate layer above the paint layer so you can control its opacity a lot better (for maximum realism in your eyes), and cut it so it doesn't go beyond the aircraft.


SMF spam blocked by CleanTalk